<!-- Begin Basic Settings: Add-in metadata, used for all versions of Office unless override provided. -->
<!-- IMPORTANT! Id must be unique for your add-in, if you reuse this manifest ensure that you change this id to a new GUID. --> <Id>09a337df-4cbf-437c-8665-6c0ed4189344</Id>
<!--Version. Updates from the store only get triggered if there is a version change. --> <Version>1.0.0.0</Version> <ProviderName>[Provider name]</ProviderName> <DefaultLocale>en-US</DefaultLocale> <!-- The display name of your add-in. Used on the store and various places of the Office UI such as the add-ins dialog. --> <DisplayNameDefaultValue="My Office Add-in" /> <DescriptionDefaultValue="[Document Add-in description]"/>
<!-- Icon for your add-in. Used on installation screens and the add-ins dialog. --> <IconUrlDefaultValue="https://localhost:3000/assets/icon-32.png" /> <HighResolutionIconUrlDefaultValue="https://localhost:3000/assets/icon-80.png"/>
<!--If you plan to submit this add-in to the Office Store, uncomment the SupportUrl element below--> <!--<SupportUrl DefaultValue="[Insert the URL of a page that provides support information for the app]">-->
<!-- Domains that will be allowed when navigating. For example, if you use ShowTaskpane and then have an href link, navigation will only be allowed if the domain is on this list. --> <AppDomains> <AppDomain>AppDomain1</AppDomain> <AppDomain>AppDomain2</AppDomain> <AppDomain>AppDomain3</AppDomain> </AppDomains> <!--End Basic Settings. -->
<!--Begin TaskPane Mode integration. This section is used if there are no VersionOverrides or if the Office client version does not support add-in commands. --> <Hosts> <HostName="Document" /> </Hosts> <DefaultSettings> <SourceLocationDefaultValue="https://localhost:3000/index.html" /> </DefaultSettings> <!-- End TaskPane Mode integration. -->
<Permissions>ReadWriteDocument</Permissions>
<!-- Begin Add-in Commands Mode integration. --> <VersionOverridesxmlns="http://schemas.microsoft.com/office/taskpaneappversionoverrides"xsi:type="VersionOverridesV1_0">
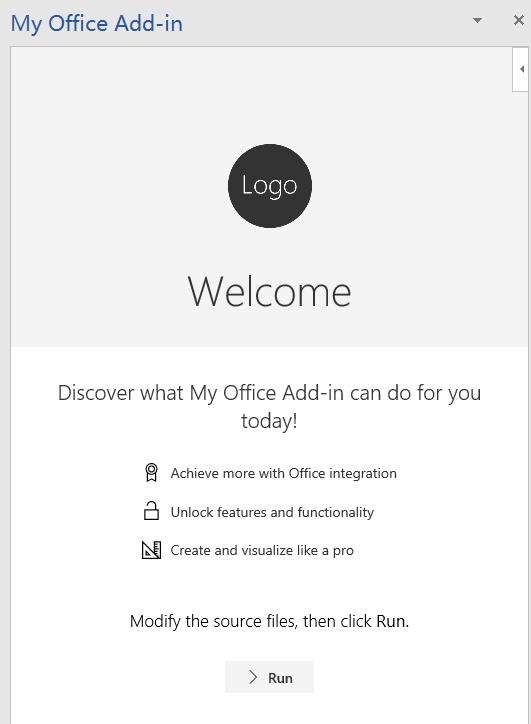
<!-- The Hosts node is required. --> <Hosts> <!-- Each host can have a different set of commands. --> <!-- Excel host is Workbook, Word host is Document, and PowerPoint host is Presentation. --> <!-- Make sure the hosts you override match the hosts declared in the top section of the manifest. --> <Hostxsi:type="Document"> <!-- Form factor. Currently only DesktopFormFactor is supported. --> <DesktopFormFactor> <!--"This code enables a customizable message to be displayed when the add-in is loaded successfully upon individual install."--> <GetStarted> <!-- Title of the Getting Started callout. resid points to a ShortString resource --> <Titleresid="Contoso.GetStarted.Title"/>
<!-- Description of the Getting Started callout. resid points to a LongString resource --> <Descriptionresid="Contoso.GetStarted.Description"/>
<!-- Point to a url resource which details how the add-in should be used. --> <LearnMoreUrlresid="Contoso.GetStarted.LearnMoreUrl"/> </GetStarted> <!-- Function file is a HTML page that includes the JavaScript where functions for ExecuteAction will be called. Think of the FunctionFile as the code behind ExecuteFunction. --> <FunctionFileresid="Contoso.DesktopFunctionFile.Url" />
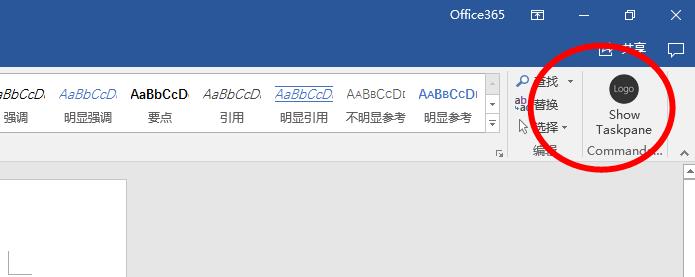
<!-- PrimaryCommandSurface is the main Office Ribbon. --> <ExtensionPointxsi:type="PrimaryCommandSurface"> <!-- Use OfficeTab to extend an existing Tab. Use CustomTab to create a new tab. --> <OfficeTabid="TabHome"> <!-- Ensure you provide a unique id for the group. Recommendation for any IDs is to namespace using your company name. --> <Groupid="Contoso.Group1"> <!-- Label for your group. resid must point to a ShortString resource. --> <Labelresid="Contoso.Group1Label" /> <!-- Icons. Required sizes 16,32,80, optional 20, 24, 40, 48, 64. Strongly recommended to provide all sizes for great UX. --> <!-- Use PNG icons. All URLs on the resources section must use HTTPS. --> <Icon> <bt:Imagesize="16"resid="Contoso.tpicon_16x16" /> <bt:Imagesize="32"resid="Contoso.tpicon_32x32" /> <bt:Imagesize="80"resid="Contoso.tpicon_80x80" /> </Icon>
<!-- Control. It can be of type "Button" or "Menu". --> <Controlxsi:type="Button"id="Contoso.TaskpaneButton"> <Labelresid="Contoso.TaskpaneButton.Label" /> <Supertip> <!-- ToolTip title. resid must point to a ShortString resource. --> <Titleresid="Contoso.TaskpaneButton.Label" /> <!-- ToolTip description. resid must point to a LongString resource. --> <Descriptionresid="Contoso.TaskpaneButton.Tooltip" /> </Supertip> <Icon> <bt:Imagesize="16"resid="Contoso.tpicon_16x16" /> <bt:Imagesize="32"resid="Contoso.tpicon_32x32" /> <bt:Imagesize="80"resid="Contoso.tpicon_80x80" /> </Icon>
<!-- This is what happens when the command is triggered (E.g. click on the Ribbon). Supported actions are ExecuteFunction or ShowTaskpane. --> <Actionxsi:type="ShowTaskpane"> <TaskpaneId>ButtonId1</TaskpaneId> <!-- Provide a url resource id for the location that will be displayed on the task pane. --> <SourceLocationresid="Contoso.Taskpane.Url" /> </Action> </Control> </Group> </OfficeTab> </ExtensionPoint> </DesktopFormFactor> </Host> </Hosts>
<!-- You can use resources across hosts and form factors. --> <Resources> <bt:Images> <bt:Imageid="Contoso.tpicon_16x16"DefaultValue="https://localhost:3000/assets/icon-16.png" /> <bt:Imageid="Contoso.tpicon_32x32"DefaultValue="https://localhost:3000/assets/icon-32.png" /> <bt:Imageid="Contoso.tpicon_80x80"DefaultValue="https://localhost:3000/assets/icon-80.png" /> </bt:Images> <bt:Urls> <bt:Urlid="Contoso.Taskpane.Url"DefaultValue="https://localhost:3000/index.html" /> <bt:Urlid="Contoso.GetStarted.LearnMoreUrl"DefaultValue="https://go.microsoft.com/fwlink/?LinkId=276812" /> <bt:Urlid="Contoso.DesktopFunctionFile.Url"DefaultValue="https://localhost:3000/function-file/function-file.html" /> </bt:Urls> <!-- ShortStrings max characters==125. --> <bt:ShortStrings> <bt:Stringid="Contoso.TaskpaneButton.Label"DefaultValue="Show Taskpane" /> <bt:Stringid="Contoso.Group1Label"DefaultValue="Commands Group" /> <bt:Stringid="Contoso.GetStarted.Title"DefaultValue="Get started with your sample add-in!" /> </bt:ShortStrings> <!-- LongStrings max characters==250. --> <bt:LongStrings> <bt:Stringid="Contoso.TaskpaneButton.Tooltip"DefaultValue="Click to Show a Taskpane" /> <bt:Stringid="Contoso.GetStarted.Description"DefaultValue="Your sample add-in loaded succesfully. Go to the HOME tab and click the 'Show Taskpane' button to get started." /> </bt:LongStrings> </Resources> </VersionOverrides> <!-- End Add-in Commands Mode integration. -->